All Category
All Category
An overheating computer, whether it be a laptop or a desktop PC, often indicates that the CPU needs attention. In a hot country like India, where summer temperatures can soar, thermal paste replacement is a much overlooked task, but it is a very economical and good solution for an old PC upgrade. This is a step-by-step tutorial from noticing the symptoms of thermal paste change to the actual operation at home.
This means taking away the old, dried up thermal paste that lies between the processor (or graphics card) and the cooling system, cleaning the surfaces, and putting on a new one. The main function of thermal paste is to create a heat path from the processor to the heat sink. Without a good conductive layer, a CPU will heat up immediately, causing either thermal throttling or irreparable damage.
It is like a car engine oil change — a simple annual maintenance task done to keep your system temperature low and running smoothly for years.
Whenever the paste is old enough, it will likely get dry, crack, and fall off, losing its thermal conductivity (heat transfer) function. In this case, a CPU or GPU will heat up abnormally, causing a system slowdown (thermal throttling) as the system intentionally reduces performance to prevent damage. This is very inconvenient for laptops where the space for air ventilation is very limited anyway. The temperature can be lowered by 5 to 15 degrees Celsius with a new thermal paste application.
Changing thermal paste at the right time is a balancing act: you must keep an eye on the signs so that you do not end up running a system with dried-up paste. Ignoring signs of deterioration can bring performance problems, unstable operation, and in worst scenarios, hardware damage.
Generally, a user would be fine with changing thermal paste every 2 to 4 years. But the interval varies with the type of paste, the surrounding conditions, and the extent of usage. An intense gaming system located in a dusty, hot environment of an Indian city may require replacement every 2 years compared to one used very little in an office which can last 4 years or more.
Laptops, due to their smaller design and greatly higher temperatures, are subject to more frequent thermal paste change. You can almost be certain that the paste is well beyond its usefulness with a 5-year-old laptop that has had no paste replacement.

First of all, figuring out how to apply thermal paste properly in a laptop can be very helpful in case of emergency repairs. Laptops are quite fragile during disassembly compared to desktops, but the main rules are identical. Before you start, make sure you have: a fresh tube of electrically non-conductive thermal compound (such as Arctic MX-4 or Noctua NT-H1), 90% or greater isopropyl alcohol, lint-free cloths or coffee filters, a screwdriver with a small Phillips head, and a plastic spudger for opening the case without damage.
Step 1: Getting Ready and Ensuring Safety
Turn off your laptop completely and disconnect it from the power supply. Take out the battery if you can (many newer models have the battery inside, so just make sure the laptop is off). Do your work on a clean and static-free place like a wooden table. It would be great if you had an anti-static wrist strap, but if you don't, a convenient alternative is to keep touching a metal tap from time to time to discharge static electricity.
Flip the laptop over and unscrew all the externally visible screws from the bottom cover. A magnetic screw tray will be very helpful because the screws can vary in size.
Step 2: Taking Apart and Detaching Heatsink
You will find the motherboard, fan, and heatsink after opening the bottom cover. Usually, the heatsink is a piece of metal with copper heat pipes on it and is situated directly on top of the CPU and GPU. The fan cable is the first thing that needs to be disconnected from the motherboard before taking the heatsink out. Be very gentle in pulling the connector apart.
Next, the screws that fasten the heatsink need to be unscrewed in the sequence indicated by numbers (normally in a cross pattern). The heatsink can then be lifted with care - if the old paste is quite dry it may have formed a sticky joint, so you can use a gentle twisting motion of the heatsink to separate it. Do not forget that the heat pipes are delicate and can be bent.
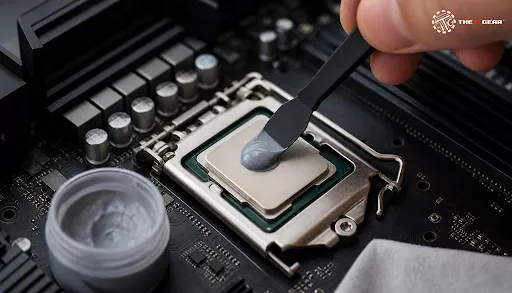
Step 3: Removing Old Thermal Paste
This is a very significant step. Dab a tiny quantity of isopropyl alcohol on a lint-free tissue or coffee filter and carefully remove the old thermal paste from the CPU/GPU die and the heatsink's contact plate without scratching them. Use a clean cloth for the last wipe. This will make sure that no film of paste remains.
Let the surfaces dry in the air for a while. Do not use paper towels because they leave small fibers on the surface that will be a barrier to heat transfer. A clean surface is the biggest reason for the successful operation of the new paste.
Step 4: Putting on New Thermal Paste
If the laptop CPU or GPU does not have a heat spreader and the small chip is visible, the best way is to put on the paste in a thin layer covering the whole surface. Put a small bit of paste (the size of a grain of rice) in the middle and then take a clean plastic card or a finger wrapped in a piece of plastic and spread it evenly and very thinly. You want it to be just enough to cover the die with a thin layer that can be seen - too much can be a danger if it gets outside.
Step 5: Putting Everything Back Together and Running the Last Tests
Put the heatsink carefully back on the CPU/GPU, checking that the contact is perfect. Screw back the heatsink by following the opposite method of unscrewing and do not fully tighten a screw if other screws are not tightened yet (usually, the screws are tightened in the shape of an "X"). Connect the fan cable.
Put the bottom panel and the screws back. Boot the system and check the temperatures right away. The readings should be much lower than before (in the best case, the temperatures will be below 40°C during idling) and even during the heaviest workload the temperatures will be reasonably low.

When you learn how to change thermal paste on GPU, you become capable of drastically improving performance and cutting down the noise level of your fan for graphics cards that are 2 years or more old. The technique is almost the same as with a laptop CPU, but the problem is that the GPU die is larger and there is memory and VRM around it. To be able to do it, you must take apart the graphics card, and it is very likely that you will void its warranty.
Here is a mere checklist to verify you haven't missed any single step before shutting down your machine. Success in the removal and replacement of thermal paste depends on preparation and the tiniest details that need your focus.

Thermal paste replacement is one of the easiest and most effective things in the category of PC maintenance that you will do. It will refresh your old laptop, make your desktop computer quiet, and most importantly, avoid costly hardware damage.
By identifying the symptoms of dead thermal paste and doing things right, you will be able to save a lot of money on other repairs and be happy with a cooler, faster, and stable system. Whenever you want high quality thermal paste and PC maintenance, turn to The IT Gear to get products that keep your technology in top form.
Can I replace thermal paste myself?
Yes, you can change the thermal paste yourself. Installing new thermal paste is simple enough for a novice to tackle if they have proper instructions. One of the most important steps is cleaning. Make sure you use at least 90% isopropyl alcohol and a lint-free cloth to wipe off all the old paste before you apply a new one.
Is changing thermal paste risky?
When done correctly, it is almost risk-free. The major risk is not changing it when the paste has worn out, because it could be a cause of overheating and you'll end up with CPU damage which is permanent. To keep it safe, choose a static-free surface, be gentle with the components you handle, and secure the heatsink properly with even pressure.
Can I use 70% alcohol to remove thermal paste?
Yes, but the higher the concentration, the better. The problem with 70% isopropyl is that it contains a quarter of water. The extra water can potentially cause damage based on the situation and duration of exposure. It has more water in it, which takes longer to evaporate and could leave moisture behind on the delicate CPU surface. You should always use 90% or higher isopropyl alcohol, which evaporates quickly and doesn't leave residue, for best results.
Is thermal paste 100% needed?
If your processor or graphics card relies on a heatsink, you can't do without thermal paste. Otherwise, there will be tiny air pockets acting as insulators between the processor and cooler, which will cause the processor to overheat straight away. This will lead to thermal throttling and finally, hardware failure. Under no circumstances should a CPU ever be run without thermal paste.


#No. 9, 5th Floor, Max City Center, T. P Lane, Sadar Patrappa Road, Bengaluru - 560002 (Karnataka)