



Select a category

With computer games and video content production booming in India, graphic card installation is probably the highest-yield improvement a builder could think of. A dedicated graphics card can enhance frame rates a few times over in PC games, enable even more efficient video creation, and speed up day-to-day tasks.
But despite this, people do not upgrade their graphics cards because they fear hurting expensive components while the upgrade is ongoing. This article is a step-by-step illustration of the graphic card installation, from pre-checking to physically putting in the card and finally the drivers.
Graphic card installation refers to either mounting a new GPU unit on a desktop system or changing an old card for a new one. The new graphics card will physically go in a PCIe x16 slot, the longest connector at the back of a computer motherboard.
After that is securely mounted and locked, the card must be fixed to the chassis case by screws or some other screw tools used at the computer case side, and the last thing will be getting a power supply through PCIe power cables connected and driver installation for the new graphics card to make it work.
A graphics card installation without problems depends more on a proper setup before it than the skill to handle the technical aspects at all! You are definitely going to need a Phillips-head screwdriver as well as good lighting to do this task. It is best to leave the cabinet open and the door off so one can have enough space for the work, or the cabinet can be turned sideways.
But you have to make sure you are working safely to avoid getting an electric shock or harming your computer! Check also that the new card has a compatible power connector and is physically capable of being inserted into the motherboard slot before you touch any component of the card.
What Is the First Step When Installing a New Graphics Card?
First of all, you need to turn off the PC, shut off the computer power supply unit, and also remove the power cable completely from the mains. After that, you have to earth yourself. Just touch a part of the cabinet (not painted) or wear a grounding strap in case you cannot touch the cabinet so you are not going to damage the card with electrostatic discharge.
When there is a move from one GPU vendor or brand to another, the first correct step would be to completely uninstall the old drivers using Display Driver Uninstaller (DDU). Doing that while the system is still booting ensures that there are no leftover files to cause any conflict with the new driver.
Compatibility checks will be done during this step as well: First, make sure your motherboard has at least one free PCIe x16 slot. The cabinet should have enough space to put in the graphics card. The power supply needs to provide enough watts using the correct PCIe cable, usually a 6-pin, 8-pin or 6+2-pin connector. If you are not fully certain, you can check The IT Gear's graphics card collection to get all the details to compare and make your choosing easier and less stressful.
After you've prepared everything, it's time to install a GPU. These steps can guide you if you already have a gaming PC that you'd like to upgrade or you are fitting a new motherboard with a graphics card.
1. Take down the side panel, flip the PC on its side, and remove the card or cover plate. If you have an old graphics card plugged in, unplug the power cables, unscrew the bracket, release the slot latch, and carefully lift the card out. On first-time installation, the metal blanking plate that matches the top slot simply has to be removed.
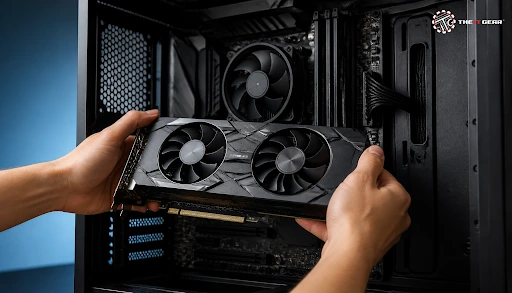
2. The first thing to be done when inserting the graphics card is making sure the slot is clean. Don't hold the graphics card by the gold connectors or fans. Match the connector with the slot opening and gradually press it in until you sense the latch lock. Usually, it is accompanied by a click sound. This is a clear indication that the card is fully seated in the slot.
3. Fix the I/O bracket against the cabinet. Fasten the bracket to the cabinet with the screw you took off earlier, so that it supports the PCB and keeps the card secure so that it does not sag or become dislodged inadvertently over time.
4. Connect PCIe power cables. Attach the necessary power cables to the card through the connectors on the card itself. Entry-level cards sometimes may only need a 6-pin, mid-range may require an 8-pin or 6+2 pin, and high-end ones might come with two connectors. Do not replace your CPU's EPS 8-pin cable with a PCIe 8-pin one, for the pin layouts are totally different from each other so you might end up damaging the card.
5. Turn on your computer and get the video signal on your monitor. Choose the card's own HDMI or DisplayPort ports over the motherboard's ports for the display connection. If the operating system loads normally, it means that the graphics card has been successfully detected on the system and now it's time to think about installing graphics drivers.
Installation of the hardware is just a part of the work, your GPU won't run efficiently unless you get the graphic drivers right. Fortunately, most users will enjoy installing their GPU drivers through driver software from their graphics card manufacturer. Here are the major brands and software that come with driver installers:
1. Get software from the graphics manufacturer. NVIDIA users can get NVIDIA drivers via GeForce Experience, or through the driver downloads section, picking up on the Game Ready driver branch. AMD users will have to use AMD Software: Adrenalin Edition, and Intel Arc users might opt for the Intel Driver and Support Assistant, through which they can find and install Intel graphics drivers automatically.
2. For ease, you might want to go with Windows Update. On Windows 11, open Settings, select Windows Update, then choose Advanced options and Optional updates to get the latest GPU driver updates. On Windows 10, go to Settings, select Update & Security, then Windows Update, and click View optional updates. This option will also work if you've never installed the vendor's driver app, though it's likely the driver version here will be slightly behind that of the official site.
3. When you're getting ready for switching manufacturers, it's worth cleaning up after your former driver. NVIDIA and AMD allow the feature "Clean Installation" within their installer packages, that will delete driver files and registry keys related to the old driver when installing the new one. In case you're getting the black screen or screen flickering problems, run DDU in Safe Mode again to completely get rid of the drivers before installing the new ones.
Most desktops do not need to be certified technically to be able to upgrade by adding a GPU. Basically, all a PC needs is a free PCIe x16 slot, a power supply with sufficient wattage, and a case big enough to accommodate the graphics card. If your computer runs on integrated graphics, that's probably even easier since you don't have a GPU to remove first.
After a card is in the PC, attach your screen to the GPU ports instead of the motherboard VGA output so that Windows will usually switch automatically. For applications that still use the integrated GPU, open Windows Settings, go to System, Display, and Graphics, then assign "High Performance" to that program. In rare cases, you may also need to enter the BIOS and set the primary display adapter to PCIe or PEG so the system knows to prioritize the dedicated card.

Graphic card installation becomes simple when you follow a logical sequence, respect safety rules and verify each connection before powering on. The few extra minutes spent on preparation will save you hours of troubleshooting later.
If you are planning your next upgrade, The IT Gear offers a wide range of graphics cards, power supplies and PC components in India, so you can find everything you need under one roof.
Do I need to uninstall old GPU drivers before fitting a new graphics card?
You should only remove drivers if you switch brands, for instance, going away from your AMD card to be your NVIDIA card. The same brand upgrade will almost always install the updated driver over the previous version if you just let it be. Always use Driver Uninstaller (DDU) when displaying errors or for that matter leftover driver conflicts.
How can I verify that my graphics card is installed correctly?
First open the Device Manager and ensure that the GPU is listed under the Display Adapters section and that there is no warning symbol. Besides Display Adapters, the GPU name should also be listed in the Performance tab of Task Manager. The presence of the card plus spinning fans under load suggests that your installation was a success.
Why is there no display after installing the video card?
First, check whether the monitor cable is connected to the new graphics card and not the motherboard socket. After that, make sure that the PCIe power connectors are completely plugged in and the graphics card is well seated in the slot. In case the problem still exists, take out and reinsert the RAM sticks, clear the CMOS, and connect one type of monitor cable at a time.
What is the difference between a 6-pin and an 8-pin PCIe power cable for a GPU?
Different connectors on a power supply provide varying amounts of power. For example, a 6-pin connector can supply up to 75 watts whereas an 8-pin one could reach 150 watts. Apart from this, some power supplies come with the option to switch between two power output modes through a 6+2 pin cable. It is also important to keep in mind that even if you have the required number of pin connectors in the power supply for the graphics card you are going to install, the total power draw of the graphics card should be less than or equal to the rating of the power supply.





#No. 9, 5th Floor, Max City Center, T. P Lane, Sadar Patrappa Road, Bengaluru - 560002 (Karnataka)